Last updated: Apr 2023
This article is aimed at SSO System Administrators.
You will need Coviu Platform Administrator access to undertake the following Coviu SSO configuration activities or, undertake these actions in conjunction with your Coviu Platform Administrator.
FAQs
- Do we integrate with other SSO technologies?
- Information on integrating with Azure can be found here.
- If your organisation uses another means for SSO or Identity Management, let us know. Register your interest with your Coviu account representative.
- Do we support SAML 2.0?
- Yes, SAML 2.0 is the protocol we support at the moment.
- Advanced SAML Settings explained
- forceAuthn - when forceAuthn is enabled, the user will have to enter SSO username and password every time, even when they have a valid session
- disableRequestedAuthnContext - when this is enabled, it is required when using SSO for Azure Active Directory Federation Services
- Is our product (Coviu) listed in the Azure Marketplace/Gallery?
- No. Not at this stage.
- Authentication state?
- Forms based.
- Do we require Microsoft ADFS 3.0 to encrypt assertions to protect data leakage of sensitive information passed back to Coviu during logon?
- We don't support this extra layer of encryption at the moment.
- Do we require the Microsoft ADFS 3.0 to sign their assertions?
- Yes, we validate the signatures when we receive a request/response from Microsoft ADFS 3.0.
- Do we allow unique identifiers other than a users email address?
- No. At this stage, we require all user identifiers to be their email address.
Steps for SSO System Administrators
Following are the steps required to configure ADFS to work with Coviu. The PowerShell instructions listed need to be executed to perform these actions.
1. Setup the unique identifier (SPN)
Add the unique identifier ID (SPN) to be used to let the Coviu application (client) identify the ADFS service. More information on SPN can be found here - https://support.microsoft.com/en-au/help/929650/how-to-use-spns-when-you-configure-web-applications-that-are-hosted-on
Your SPN unique ID should be the platform domain mapping for your enterprise platform e.g. telehealth.companyname.com.au
Powershell command:
Add-AdfsRelyingPartyTrust -Name Coviu -Identifier spn:{unique_id}
2. Setup the callback URL
- NOTE: Your Coviu sub domain is the domain you provided to host the Coviu platform. (Check with your Coviu Application Owner or project manager if you are unsure).
- NOTE: Your chosen login email domain at the end of the string is the email domain your staff use to access SSO. You may have set up configurations for multiple email domains.
3. (Optional) Add security groups
If needed, create appropriate security groups in your organisation that you want to give access to using SAML for authentication.
Powershell command:
Set-AdfsRelyingPartyTrust -TargetName "Coviu" -AccessControlPolicyName "{name of policy name}" -AccessControlPolicyParameters @{GroupParameter="{group parameter name}"}
4. Setup claim transformation rules
To map the SAML response claims, to ones that Coviu can understand, use the following command:
Set-AdfsRelyingPartyTrust -TargetName Coviu -IssuanceTransformRules '
c:[Type == "http://schemas.microsoft.com/ws/2008/06/identity/claims/windowsaccountname", Issuer == "AD AUTHORITY"] => add(store = "Active Directory", types = ("http://schemas.xmlsoap.org/ws/2005/05/identity/claims/emailaddress","http://schemas.microsoft.com/identity/claims/displayname"), query = ";mail,displayname;{0}", param = c.Value);
c:[Type == "http://schemas.xmlsoap.org/ws/2005/05/identity/claims/emailaddress"] => issue(Type = "http://schemas.xmlsoap.org/ws/2005/05/identity/claims/nameidentifier", Issuer = c.Issuer, OriginalIssuer = c.OriginalIssuer, Value = c.Value, ValueType = c.ValueType, Properties["http://schemas.xmlsoap.org/ws/2005/05/identity/claimproperties/format"] = "urn:oasis:names:tc:SAML:1.1:nameid-format:emailAddress");
c:[Type == "http://schemas.microsoft.com/identity/claims/displayname"] => issue(claim = c);'
Verification
Following the above steps should successfully setup and configure your ADFS service to authenticate on behalf of Coviu.
To verify the setup, run this command from Powershell:
Get-ADFSRelyingPartyTrust -Name coviu
The response of this command should look similar to this:
AllowedAuthenticationClassReferences : {}
EncryptionCertificateRevocationCheck : CheckChainExcludeRoot
PublishedThroughProxy : False
SigningCertificateRevocationCheck : CheckChainExcludeRoot
WSFedEndpoint :
AdditionalWSFedEndpoint : {}
ClaimsProviderName : {}
ClaimsAccepted : {}
EncryptClaims : True
Enabled : True
EncryptionCertificate :
Identifier : {spn:unique_id from step 1}
NotBeforeSkew : 0
EnableJWT : False
AlwaysRequireAuthentication : False
Notes :
OrganizationInfo :
ObjectIdentifier : acbbb0b0-443f-eb11-845d-005056a71e43
ProxyEndpointMappings : {}
ProxyTrustedEndpoints : {}
ProtocolProfile : WsFed-SAML
RequestSigningCertificate : {}
EncryptedNameIdRequired : False
SignedSamlRequestsRequired : False
SamlEndpoints : {Microsoft.IdentityServer.Management.Resources.SamlEndpoint}
SamlResponseSignature : AssertionOnly
SignatureAlgorithm : http://www.w3.org/2001/04/xmldsig-more#rsa-sha256
TokenLifetime : 0
AllowedClientTypes : Public, Confidential
IssueOAuthRefreshTokensTo : AllDevices
RefreshTokenProtectionEnabled : True
RequestMFAFromClaimsProviders : False
ScopeGroupId :
ScopeGroupIdentifier :
DeviceAuthenticationMethod :
Name : Coviu
AutoUpdateEnabled : False
MonitoringEnabled : False
MetadataUrl :
ConflictWithPublishedPolicy : False
IssuanceAuthorizationRules :
IssuanceTransformRules : c:[Type == "http://schemas.microsoft.com/ws/2008/06/identity/claims/windowsaccountname", Issuer == "AD AUTHORITY"]
=> add(store = "Active Directory", types = ("http://schemas.xmlsoap.org/ws/2005/05/identity/claims/emailaddress",
"http://schemas.microsoft.com/identity/claims/displayname"), query = ";mail,displayname;{0}", param = c.Value);
c:[Type == "http://schemas.xmlsoap.org/ws/2005/05/identity/claims/emailaddress"]
=> issue(Type = "http://schemas.xmlsoap.org/ws/2005/05/identity/claims/nameidentifier", Issuer = c.Issuer, OriginalIssuer =
c.OriginalIssuer, Value = c.Value, ValueType = c.ValueType,
Properties["http://schemas.xmlsoap.org/ws/2005/05/identity/claimproperties/format"] =
"urn:oasis:names:tc:SAML:1.1:nameid-format:emailAddress");
c:[Type == "http://schemas.microsoft.com/identity/claims/displayname"]
=> issue(claim = c);
DelegationAuthorizationRules :
LastPublishedPolicyCheckSuccessful :
LastUpdateTime : 1/01/1900 11:00:00 AM
LastMonitoredTime : 1/01/1900 11:00:00 AM
ImpersonationAuthorizationRules :
AdditionalAuthenticationRules :
AccessControlPolicyName : Policy name from step 3
AccessControlPolicyParameters : Parameters set in step 3
ResultantPolicy : Details of the security group policy if setup in step 3
Enter the required configuration items into the Coviu SSO self-configuration interface.
The below steps will show you how to get into the Coviu SSO self-configuration interface and the configuration items you will need to save the configuration and enable SSO if you are ready.
How do I get to the self-help SSO Configuration interface?
If you do not have access to the Coviu platform as an administrator, contact your Coviu Application Owner or your internal project manager. You will need access as a platform administrator to populate the SSO self-configuration interface and activate SSO.
Log into Coviu as you normally would:
- If you are already in the platform and on the platform dashboard shown below, click System Configuration in the left hand menu.
- Click the Single Sign On tab.
- Click Add Configuration.
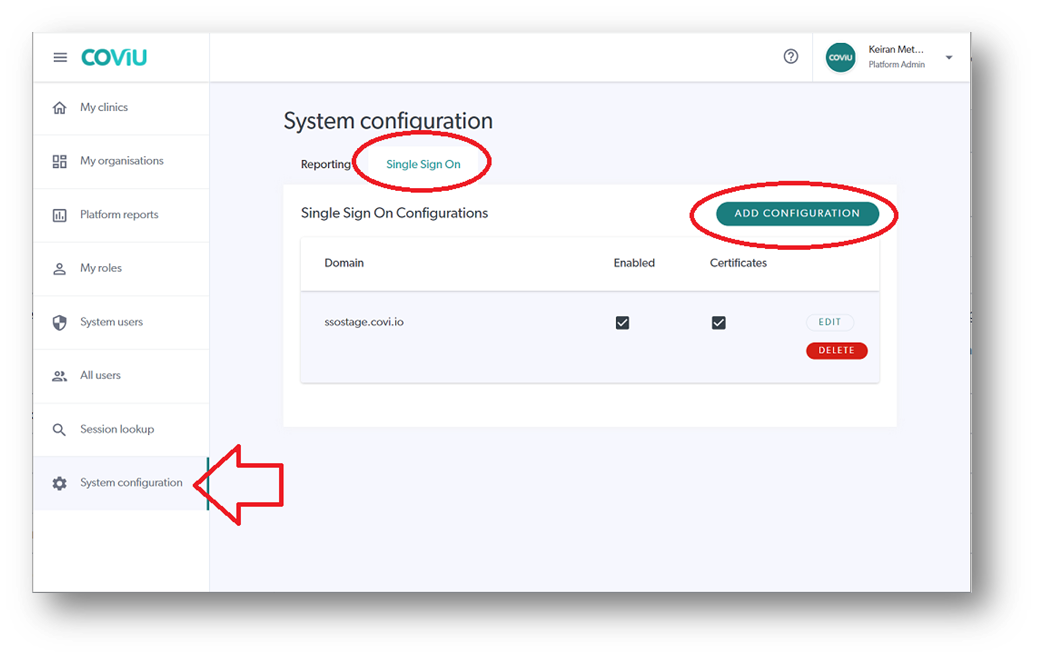
- On the Create SSO Configuration interface (see below screen capture), add the required details (See section below).
- Ticking the Enabled option will make your configuration go live so proceed with caution. (A go-live date is usually planned with the project team)
- Save the configuration when done. If you have chosen Enabled, then your system should be ready to go.
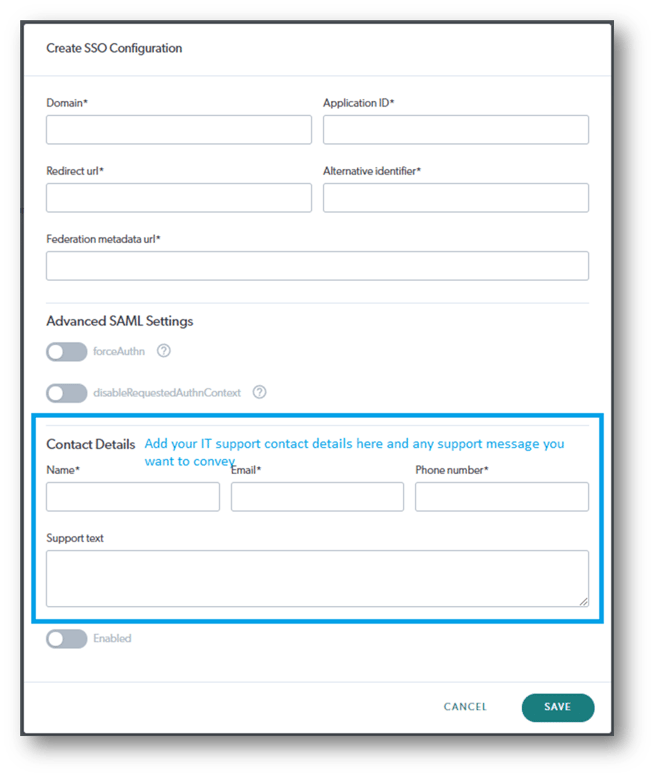
What configuration items will you need for the Interface?
The details you enter into the Coviu SSO self-help Configuration interface (below) are those details that come from creating your new Application Registration. See the below examples and then enter your specific items in the fields shown below:
- Domain = your chosen email domain
- e.g. mycompanyemail.com.au
- Application (client) ID = from your Azure portal
- From step 1 of these instructions
- Redirect URL = extracted from your federation metadata XML file
- Usually toward the bottom of your XML file
- e.g https://login.microsoftonline.com/xxxxxxxx-xxxx-xxxx-xxxx-xxxxxxxxxxxx/saml2
- Alternative Identifier (is not mandatory) = add if required
- Federation metadata URL = as per your ADFS on-prem application creation
- e.g. https://<ssodomain>/federationmetadata/2007-06/federationmetadata.xml
- e.g. https://sso.domain.com/federationmetadata/2007-06/federationmetadata.xml
- forceAuthn: Why would I turn this on?
- When forceAuthn is enabled, the user will have to enter their SSO username and password every time, even when they have a valid session.
- disableRequestedAuthnContext: Why would I turn this on?
- The library we use for SAML authentication requires PasswordProtectedTransport (PPT) to be used. Some ADFS configurations may be set up in a way that does not support PPT and will use Windows Federation Authentication Protocol. This will result in authentication context errors and the user will not be able to log in. In that case, turning this toggle on, will help the issue.
- The Contact Details section; The Name, Email and Phone Number fields are provided as part of a message to any staff member who attempts to access the platform but has not yet been provided access to a clinic in Coviu. The details could be for your Coviu Application Owner, your SSO System Administrator or your IT Service Desk for example.
- Save = to save the configuration without turning SSO on.
- Enabled toggle = to turn SSO on/off (handy for out of hours testing)
Who do I contact for Support?
- You can contact your Coviu account manager directly, alternatively,
- You can contact us through one of the options available here.