Last Updated: February 2023
Note:
- The Call Lock feature only applies to calls joined in the Waiting Area. It does not apply to User Rooms, Meeting Rooms or Scheduled Sessions (a lock is not required for those rooms as they have sufficient security mechanisms in place).
- The Waiting Area feature is available to customers who are on these plans only:
- Standard (also the Trial plan)
-
Premium
- Enterprise
- Not sure what plan you are on? Click here to find out.
- If you are on a custom Enterprise plan, please speak to your organisation's telehealth coordinator or your Coviu account representative about having this feature set up.
- To configure the Waiting Area, you must be the account Owner or Administrator.
- If you prefer to watch a short video on this instruction, click here.
On this page:
- What is the Call Lock feature?
- How to enable the Call Lock feature
- How to use the Call Lock feature
- More support options
What is the Call Lock feature?
As the host of a Waiting Area call, you might notice a new lock icon near the bottom left corner of the call interface when you connect with your guest. This feature has been added to improve your privacy during a Waiting Area call; when it is activated, it will prevent anyone else from joining your call.
This update introduced the lock mechanism to Waiting Area calls only. If you are unable to see the lock icon, please check if you are on a call taken from the Waiting Area.
The feature needs to be turned on (or off) at an account level by your Coviu account Owner or Administrator.
How to enable the Call Lock feature
- Log in to your Coviu account as you normally would.
- Scroll down on the left side menu of the Dashboard and click Configure (if you can't see the Configure button, then you are not the account Administrator).
- Click the arrow button to the right of the tabs to find the Waiting Area tab. Click Waiting Area.
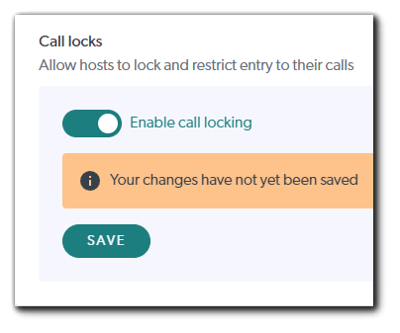
- Scroll down and click Call locks.
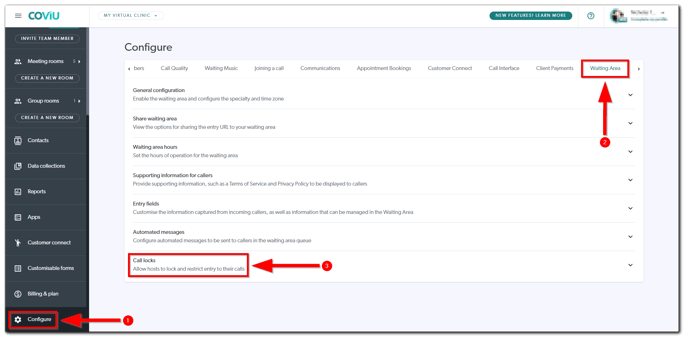
- Toggle the option on (or off) depending on your preference.
- Click Save.
Tip: Advise your team members that the feature is now available!
How to use the Call Lock feature
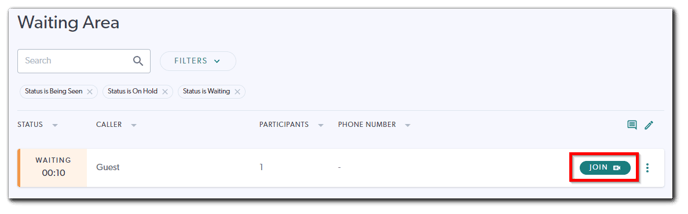
- Log in to your Coviu account as you normally would.
- Enter the call with your client or patient via the Waiting Area.
- When you have entered the call, click the Lock Call button or the lock icon to prevent anyone else from joining the call. (Please note that the button will not appear if you are in the room alone.)
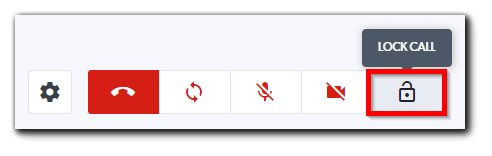
- After clicking the button, it will toggle the button to the 'locked' appearance with a confirming pop-up message that will appear near the bottom of the call interface.

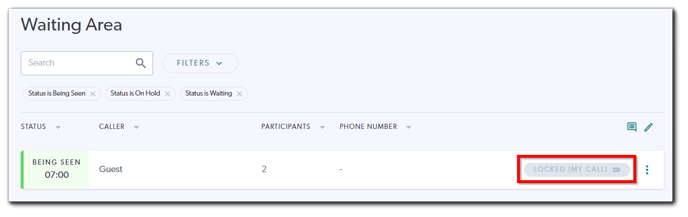
- If you look at your Waiting Area, you will see that the currently-active room is now locked. Any other user in your team trying to gain access to the room will not be able to get in until you unlock or leave the call.
More support options
You have completed another Coviu help article. You now know how you can enable the Call Lock feature for the Waiting Area.
If this is not what you were looking for, explore our knowledge base and search for another article from here.
If you still require any assistance, please do not hesitate to get in touch with our friendly Customer Success team using any of the contact methods available here.