Last Updated: March 2024
Notes:
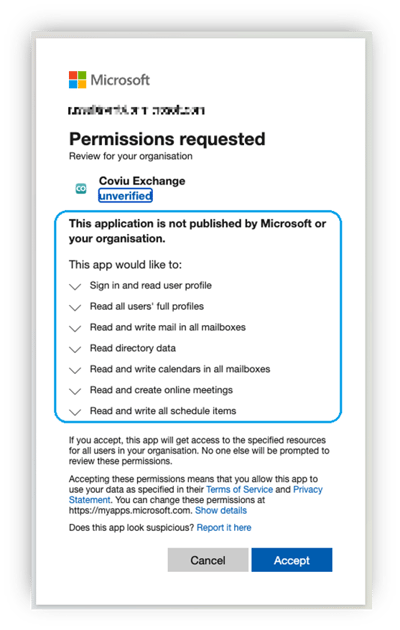
- Recommendation: Before commencing this integration, have your Microsoft Exchange Administrator or Cyber Security Manager review the Permissions shown in Step 9 below.
- If you are on a custom Enterprise plan, please speak to your organisation's Telehealth Coordinator or your Coviu account representative about having this feature set up.
- Not sure what plan you are on? Click here to find out.
- To set up this feature, you need:
- To be the Coviu account Owner or Administrator.
- To have your organisation's Microsoft Exchange Administrator on hand; they need to sign in to Microsoft Exchange at the relevant points below.
- Your organisation to be subscribed to a corporate-level Microsoft Exchange or Microsoft Office 365 Global Administrator account.
On this page:
- What is the feature of this integration?
- Is my Microsoft account suitable?
- How to integrate Microsoft Exchange with Scheduled Sessions
- More support options
What is the feature of this integration?
With this integration, you will be able to view the busy times from your Microsoft Exchange calendar on the Coviu calendar (under Schedule on the left side menu of the Dashboard) for multiple practitioners and/or your sessions.
This will help prevent double-bookings of your clinicians or, it could also show periods of extended leave for a clinician.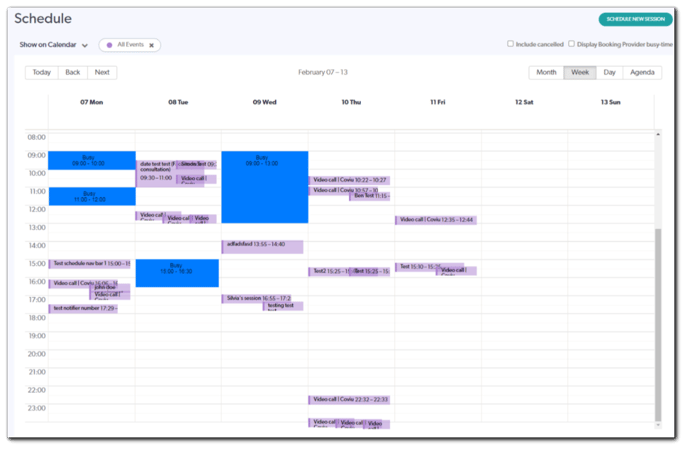 Once you have set up the integration (as shown below), click Display Booking Provider busy times on the top right corner of the Coviu calendar to view the busy times from your Microsoft Exchange.
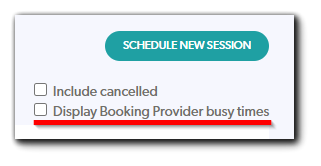
Is my Microsoft account suitable?
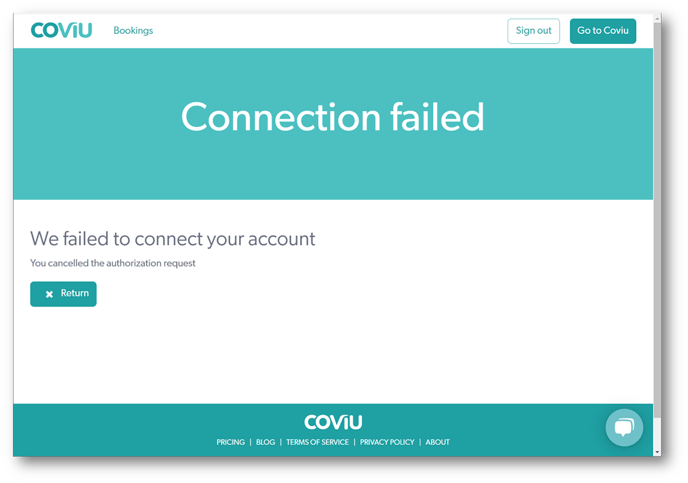
This feature can only be integrated with a corporate-level Microsoft Office 365 Global Administrator account. If you use a free Microsoft/Hotmail account, it is unlikely to allow the integration.
If you attempt to sign in and get the below message, that is telling you one of two things:
- You may not be the global Microsoft Exchange Administrator for your organisation.
- Your account may not be a corporate-level Microsoft Exchange subscription.
How to integrate Microsoft Exchange and Scheduled Sessions.
- Organise to have your Exchange Administrator on hand to sign in at the appropriate time or create an Admin account for them on your Coviu platform so they can perform steps 2 to 8 below.
- Note: Adding your Exchange Administrator to your account may impact your monthly subscription costs. We recommend having your Exchange Administrator on hand and if not, add them to your Coviu account and then remove them immediately after the below tasks are completed.
- Log into your Coviu account as you normally would.
- Download the Appointment Bookings and Scheduled Sessions Apps from our App Marketplace if you have not done so.
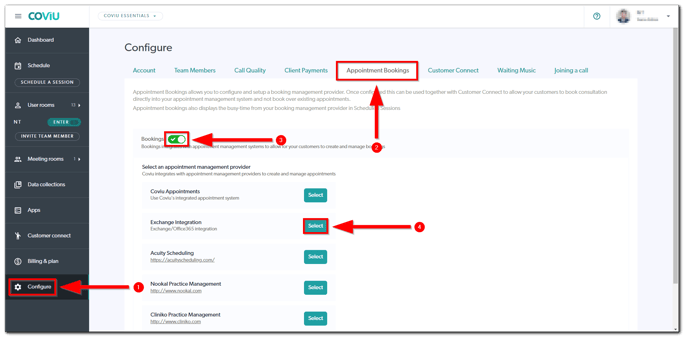
- Click Configure on the left side menu of the Dashboard (if you can't see the Configure menu, then you are not the Administrator for your account.)
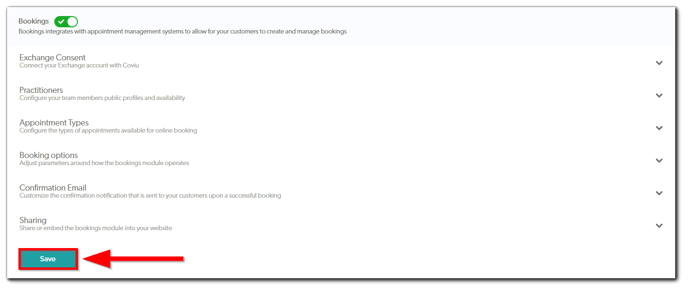
- Click the Appointment Bookings tab.
- Enable Bookings and select Exchange Integration.
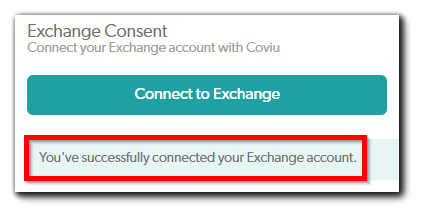
- Click Connect to Exchange to connect your Microsoft Exchange with Coviu.

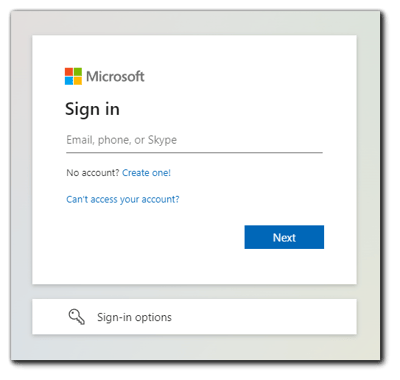
- This sign-in window is where your organisation's Microsoft Exchange Administrator needs to sign in with their global admin account credentials. Click Next.
- Accept the Permissions as shown in the example below.
- You will be redirected back to your Coviu account. It should say "You've successfully connected your Exchange account" under the Exchange Consent module.
- The below actions can be completed by a Coviu Administrator. Add all the practitioners from your clinic for whom you want to offer online bookings. Practitioners must be existing users of your account. Click the + Add practitioner button.

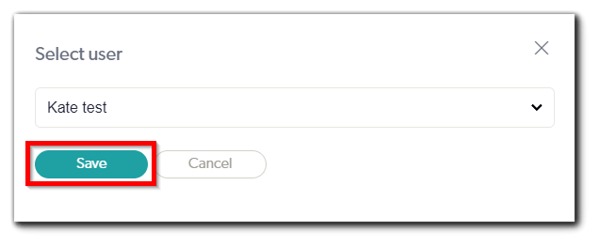
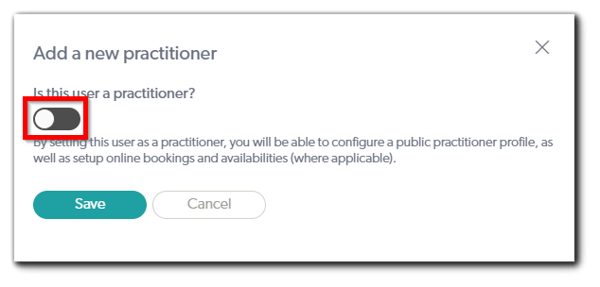
- Now select your practitioner and click Save.
- This will automatically ask you to confirm if this user is a practitioner and a calendar needs to be set up for them. Click Save.
-
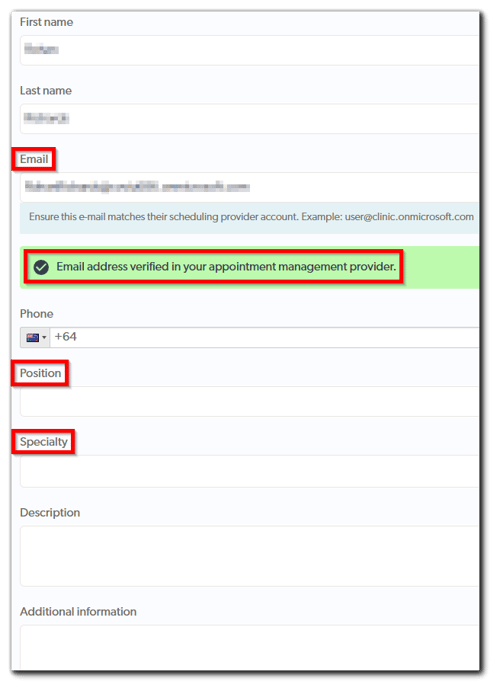
The next part is very important as it requires you to provide more details about the practitioner and lists the services they provide. Then, fill in the details.
Please ensure that you enter your Microsoft Exchange email under the Email field. You will see the "Email address verified in your appointment management provider" message directly underneath if you have entered your email correctly.
- Repeat the above steps to add more practitioners.
- Once you have added all of your practitioners, scroll down and press Save.
More support options
You have completed another Coviu help article. You now know how to set up the Microsoft Exchange integration with Scheduled Sessions.
If this is not what you were looking for, explore our knowledge base and search for another article from here.
If you still require any assistance, please do not hesitate to get in touch with our friendly Customer Success team using any of the contact methods available here.