Last Updated: June 2023
Note:
- The Scheduled Sessions App is installed by default under the following plans:
- Standard
- Premium
- Enterprise
- This App can be purchased manually under the Essentials plan. Visit our App Marketplace to find out more.
- If you are on a custom Enterprise plan, please speak to your Coviu account representative about having this App added to your account.
- Not sure what plan you are on? Click here to learn more.
- To set up this feature, you need to be the Coviu account Owner or Administrator.
- Payments of less than $0.50 may be met with an error; please ensure that your charge is $0.50 or more.
On this page:
- What are Scheduled Sessions and pre-payments?
- How do I configure Scheduled Sessions for taking payments?
- How does it work?
- Transaction fees
- More support options
What are Scheduled Sessions and pre-payments?
The Scheduled Sessions App provides an alternative way for you and your client to securely access a call. This App allows you to assign a unique link per consultation for both the host and guest which only works for the duration of that consultation. This will differ from your User Room or Waiting Area link which always remains the same. Click here to learn more about the Scheduled Sessions App.
In this article, we will cover how to attach a pre-payment request to a Scheduled Session which requires the client to pay prior to entering the call. This feature is great for those consultations where you might have a fixed fee for a service and you choose to charge for that service upfront.
How do I configure Scheduled Sessions for taking payments?
- Add the Scheduled Sessions App to your Coviu account from our App Marketplace if it is not already included in your plan. Please see the Notes at the top of this article.
- Sign up for a Stripe account to take payments.
- Connect your Stripe account to your Coviu account.
How does it work?
- When scheduling your consultation, simply attach a fee to your Guest(s).
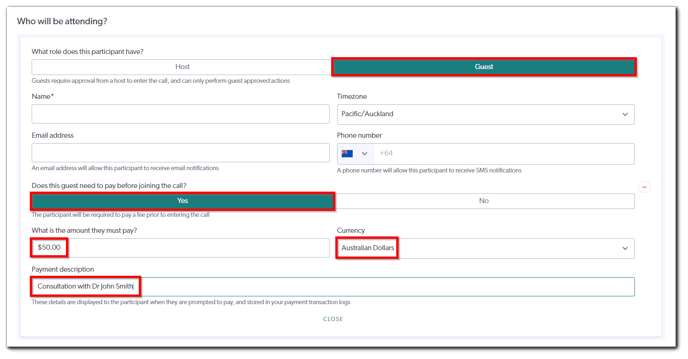
- When your client or patient clicks their unique URL to access the consultation, they will be prompted to provide payment details. Payments can be made at any time prior to the consultation, and they are processed securely by Stripe via your connected Stripe account.
- Once the payment has been received, the client or patient will then be allowed to join the consultation.
Transaction fees
Both Coviu and Stripe charge fees per transaction when using taking payments from your clients or patients.
- Click here to view the Stripe and Coviu transaction fees.
- Click here to find out what plan you are on.
More support options
You have completed another Coviu help article. You now know how to take payments when using Scheduled Sessions.
If this is not what you were looking for, explore our knowledge base and search for another article from here.
If you still require any assistance, please do not hesitate to get in touch with our friendly Customer Success team using any of the contact methods available here.