Last Updated: March 2024
Note:
- This App is installed by default on the following plans:
- Standard (also the Trial plan)
- Premium
- Enterprise
- This App can be purchased manually under the Essentials plan. Visit our App Marketplace to find out more.
- To add this App to your Coviu account, you must be the account Owner or Administrator.
- If you are on a custom Enterprise plan, please speak to your Coviu account representative about having this App added to your account.
- Not sure what plan you are on? Click here to learn more.
On this page:
- Introduction and features
- How to install Scheduled Sessions
- How to assign precall forms to a client or patient
- How to schedule a session
- How to view your upcoming sessions
- How to reschedule or delete a session
- How to uninstall an App
- FAQ
- More support options
Introduction and features
The Scheduled Sessions feature provides another workflow option for holding calls with your clients or patients. By adding Scheduled Sessions to your Coviu account, you will have the ability to schedule calls for your team.
Calls held in a scheduled session are similar to holding a call in your User Room or Meeting Room however you now have the option to schedule them. Plus, the link to access a scheduled session is unique for each session, providing an extra layer of security.
What are the main features?
Unique call scheduling
Scheduled calls can be configured to occur at a given time and duration for a set of configured host and guest participants. Each participant receives their own, unique entry URL so the only people that will have access to the call will be the invited participants - which makes it great for conducting scheduled consultations.
Bookings calendar
The Scheduled Sessions App provides an easy-to-use calendar that lets you see your upcoming sessions and schedule new sessions with minimum fuss.

Taking payments
You can easily set up a fee for your consultations. Simply add a fee to a participant when scheduling the session, and the client will be required to make the payment before being able to join the call. They can pay in advance of the consultation, or at any time before the call. Being paid for your consultations has never been easier! Click here to learn more.
Precall forms
In addition to in-call Customisable Forms, the Customisable Forms App now supports the ability for providers to send forms to their clients or patients before their scheduled session. This will allow clients or patients to complete forms days or even weeks before their scheduled consultation! This can be super helpful in determining the urgency and complexity of the appointment for triaging purposes, as well as provide great insight to your client or patient before the appointment.
How to install Scheduled Sessions
- Log in to your Coviu account as you normally would. If you do not yet have an account, you can sign up here.
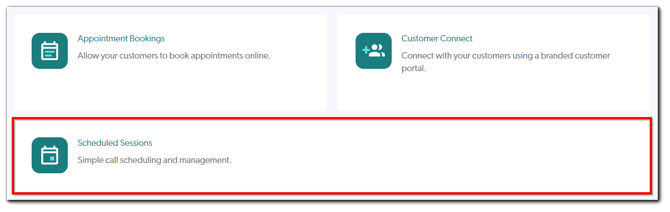
- Click Apps on the left side menu of the Dashboard (if you can't see the Apps menu, then you are not the Administrator for your account).
- Click Find Apps near the top right corner of your screen. This will take you to Coviu’s App Marketplace.
- Once in the App Marketplace, scroll down to find Scheduled Sessions and click it. Follow the prompts to install it.
- Once installed, return to your Coviu account to start scheduling your sessions.
How to assign precall forms to a client or patient
- You will need to add the client or patient as a Contact first to be able to assign them precall forms before their consultation; click here to learn more about how to manage your contacts.
- Create your custom form(s) if you have not done so already. You can click here to learn more about how to create your custom forms.
- Finally, you can schedule your session as seen below (note step 3, section g).
How to schedule a session
- Log in to your Coviu as you normally would.
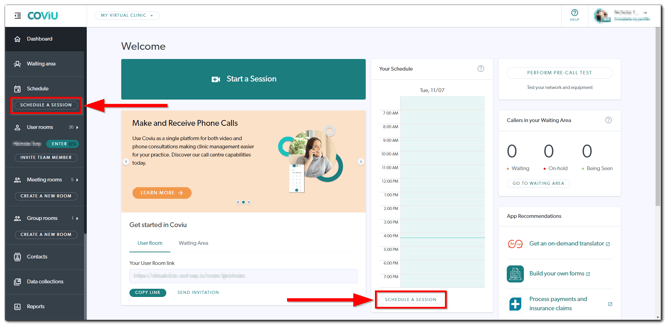
- On the Dashboard and under Your Schedule, you can click and drag over the specific time to schedule your session for the day.
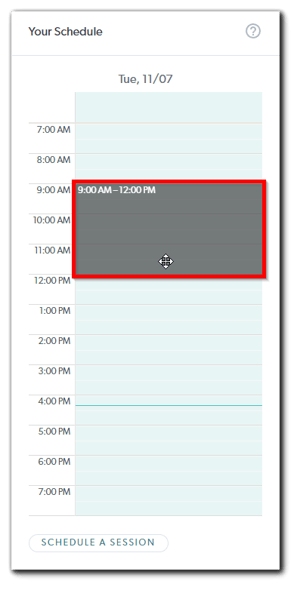
- Alternatively, you can click Schedule A Session on the left side menu of the Dashboard or click Schedule A Session underneath Your Schedule.
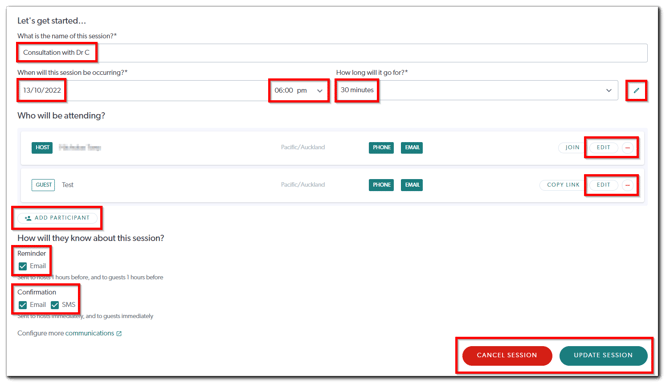
- A form to fill out will be shown to you; fill out the required details of the consultation including:
- The name of the session (e.g. Consultation with Dr John Smith).
- The date and start time of the session.
- The duration of the session (you can either select one of the preset times available under the dropdown field or click the pen button beside the field to enter a custom duration in minutes).

- Add your participants. Click add one now to start.

- A scheduled session requires at least one Host (i.e. the healthcare provider) and one Guest (i.e. the client or patient).
- To be a Host, you need to be an existing user of the Coviu account (i.e. either a Team member or an Administrator).
- For the Host, the fields will be automatically filled according to what has been entered in your Coviu Profile.

- You can edit the Name and Timezone fields manually if you wish. However, you will need to edit your Coviu profile if you wish to edit the Email address and Phone number. Click here to learn more about how to edit your Coviu profile. (Please note that you can only edit your own Coviu profile.)
- Click Add Participant to add your Guest(s).

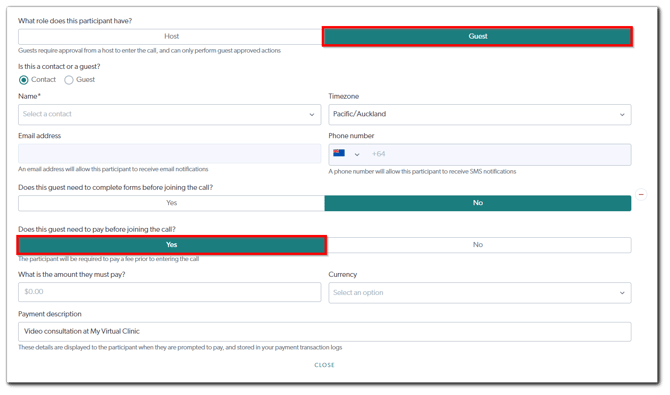
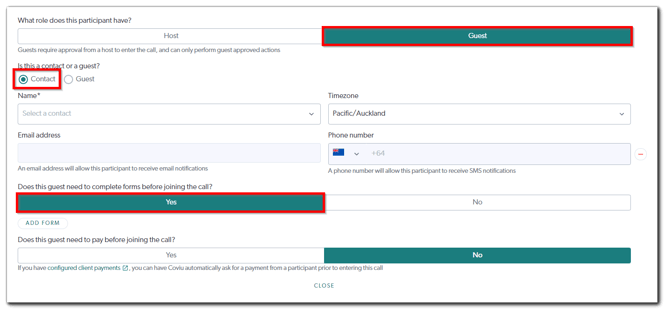
- For Guest(s), you will need to enter the following details:

- The type of Guest; is your Guest an existing Contact or a new Guest? Click here to learn more about how to manage your contacts.
- If it is an existing Contact, then their Name, Email address and Phone number will be entered automatically. Otherwise, you will need to enter them manually.
- The Timezone they reside in. This will display the date and start time of the consultation in their timezone.
- If the Guest is an existing Contact, you can determine if they need to complete a form (or multiple forms) prior to their consultation. The forms that you can share with your Guest are gathered from your Customizable Forms. Click here to learn more about how to create your custom forms.
- Determine if the Guest needs to pay before the consultation. Click here to learn more.
- If you have set up your communications, they will appear under Confirmation and Reminder. You can manually uncheck the Email and/or SMS checkboxes if you do not wish to send the confirmation and/or reminder for the consultation. To manage your communications, click communications. Click here to learn more about managing your communications.
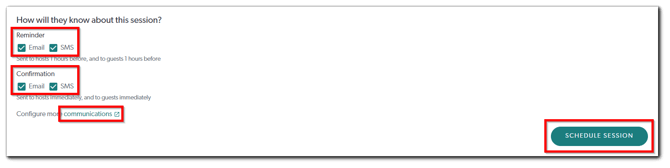
- Finally, click Schedule Session to finish.
Note: SMS charges will apply if you enable SMS confirmations and/or reminders; click here to learn more.
How to view your upcoming sessions
- Beside Schedule on the left side menu of the Dashboard, you will see a number right next to an arrow.
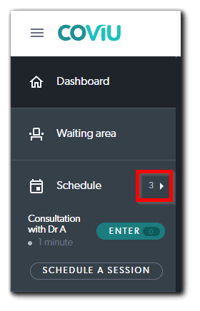
- This number indicates how many upcoming Scheduled Sessions appointments you have and you can click the arrow to display more of your upcoming appointments. You can then click on any of your upcoming appointments to view their details.
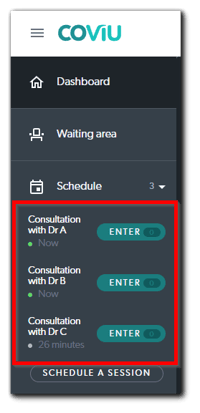
- Alternatively, you can also click Schedule on the left side menu of the Dashboard to bring up the full calendar to view your upcoming appointments.

How to reschedule or delete a session
Note:
- You can only reschedule future appointments that are scheduled at least 1 minute ahead of your current time.
- You can only delete future appointments that are scheduled at least 7 minutes ahead of your current time.
- From the left side menu under Schedule or the calendar, choose the future appointment you would like to reschedule or delete.
- You can edit the name, date, start time and duration of the session if you wish.
- You can also edit participant(s) details by clicking Edit to the very right of their name(s).
- You can remove participant(s) by clicking the red minus to the very right of their name(s) or add more participant(s) by clicking Add Participant.
- You can click the checkboxes beside Email and/or SMS under Confirmation and/or Reminder to manage the appointment communications.
- Click Update Session to update the scheduled appointment with new details. All participants will receive a new confirmation email and/or SMS given that these options are still ticked under Confirmation.
- Otherwise, click Cancel Session to delete the scheduled appointment.
How to uninstall an App
Click here to learn how to uninstall an App from your Coviu account.
Note: If you have sessions scheduled in the future, you will lose those sessions and all of their details!
FAQ
- What if I am running late to join my client or patient? Does the unique session link timeout?
- The unique session link remains accessible and can be used for the duration of the scheduled session. It only expires once the duration is over.
- What if my consultation is running overtime? Does the session timeout?
- No. As long as you stay connected in session, it will continue for as long as you need it to.
- Can my client or patient join a scheduled session early?
- Yes. A client or patient can join a scheduled session link up to 5 minutes before the session's start time.
- Can I reuse a scheduled session link?
- No. One of the main features of the Scheduled Sessions App is that the access link is unique for each session. If you would like a workflow that has a permanent room link for each consult, consider using your User Room link.
- Can I schedule recurring appointments for my client or patient?
- No. You can schedule as many appointments for your clients or patients as far into the future as you wish. However, we do not currently have an option for a 'one-touch' recurring appointment maker. This is on our list for future development.
- Can I send an SMS invitation to my client or patient?
- Yes. You can send SMS invitations to your clients or patients; please refer to the how to schedule a session section above.
- Can I delete past appointments?
- No. You can only delete or reschedule future appointments that are scheduled at least 10 minutes ahead of your current time.
More support options
You have completed another Coviu help article. You now know how to install and use the Scheduled Sessions App.
If this is not what you were looking for, explore our knowledge base and search for another article from here.
If you still require any assistance, please do not hesitate to get in touch with our friendly Customer Success team using any of the contact methods available here.