How to Install and Use Customer Connect App
This article describes how to set up your Customer Connect portal.
Last Updated: March 2024
Note:
- Customer Connect is installed by default under the following plans:
- Standard (also the Trial plan)
- Premium
- Enterprise
- This App can be purchased manually under the Essentials plan. Visit our App Marketplace to find out more.
- If you are on a custom Enterprise plan, please speak to your Coviu account representative about having this App added to your account.
- Not sure what plan you are on? Click here to learn more.
- To set up this feature, you will need to be the Owner or Administrator of your account.
- The implementation of some modules mentioned below may have an impact on the chosen client or patient workflow for your clinic or practice. Read through the instructions first and decide which modules suit your practice with your team members. A module can easily be deactivated at the touch of a button.
On this page:
- What is Customer Connect?
- How to install Customer Connect App
- Steps to configure Customer Connect App
- Linking your Customer Connect portal to your website
- How to uninstall an App
What is Customer Connect?
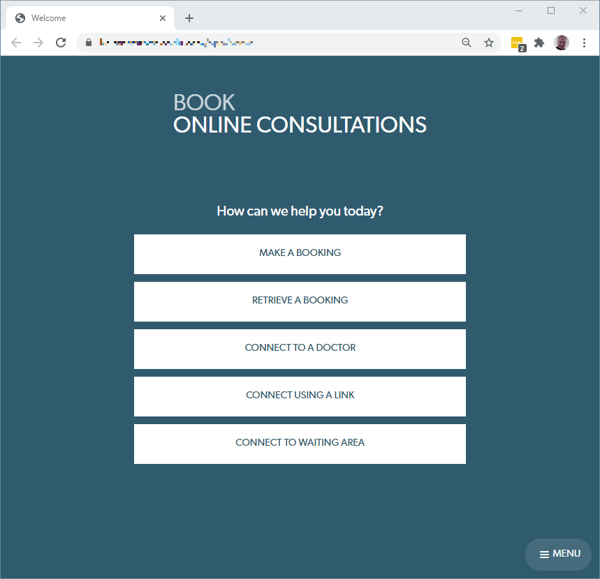
Customer Connect is an online portal (or website) that your clients or patients can use to interact with you in various ways. This includes making and cancelling appointments and connecting to your clinic's Waiting Area or a consultation room.
Click here to learn more about Customer Connect and how it can help you interact with your clients or patients, or read on to learn how to configure it for your practice.

- The first two buttons allow your client or patient to make or retrieve an online appointment booking.
- The third button allows direct access to your clinicians' User Rooms. A client or patient cannot enter a room unless invited to do so by the clinician.
- The fourth button allows connection using a specific room or appointment link.
- The fifth button allows for access to your Waiting Area.
Something to keep in mind is that the options you choose to make available in your portal should align with the client or patient workflow of your clinic.
For example, if you have chosen to use a workflow where your clients or patients enter using the Waiting Area (i.e. the virtual reception or front door), then you might not want to enable the third button shown in the screen capture above. Similarly, if your clients or patients connect directly with their providers, then you may not want to enable the fifth button.
How to install Customer Connect App
- Log in to your Coviu account as you normally would. If you do not have a Coviu account, you can sign up here.
- Click Apps on the left side menu of the Dashboard (if you can't see the Apps menu, then you are not the Administrator for your account).
- Click Find Apps near the top right corner of your screen. This will take you to Coviu’s App Marketplace.
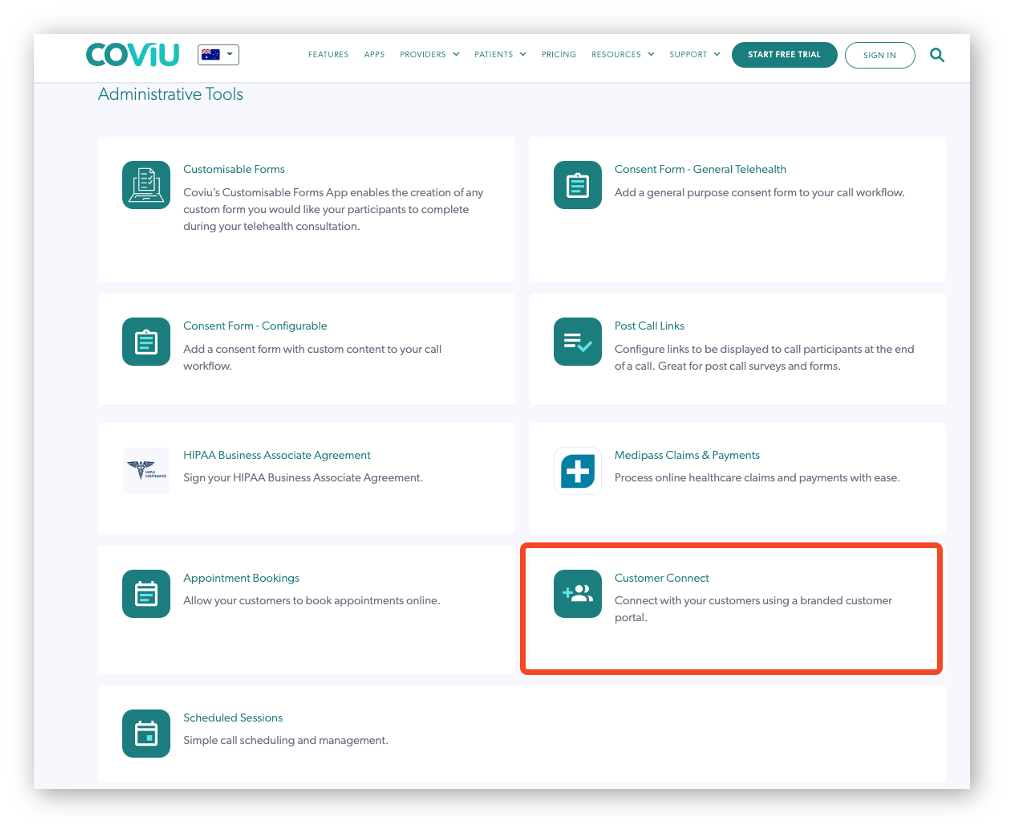
- Once in the App Marketplace, scroll down to find the Customer Connect App and click it. Follow the prompts to install it.
- Return to your Coviu account.

Steps to configure Customer Connect App
Customer Connect and other Apps
- We recommend that you also install the Appointment Bookings App and Schedule Sessions App while you are there.
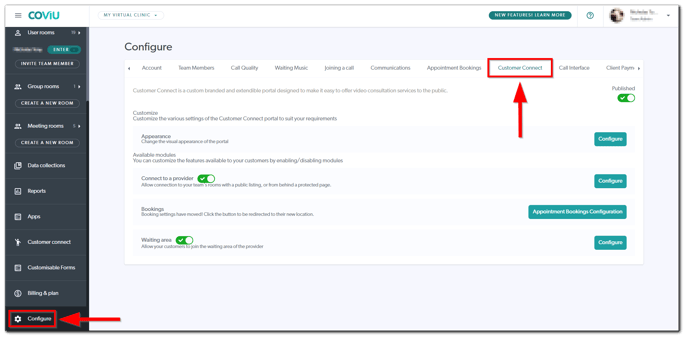
- Back in your Coviu account, click Configure on the left side menu of the Dashboard, then click Customer Connect.

Configuring Customer Connect and other Modules
- Firstly, you can customise the colours and wording of the portal. Click the Configure button in the Appearance menu. You will have the ability to change:
- The title and subtitle.
- To hide or show the Connect using a link menu option on the Customer Connect portal.
- The colour theming.
- Don't forget to click Save when you are finished in this menu.

- Next, you can decide which of the available modules you will activate and configure. To activate a module, click
 .
.
- The Connect to a provider module adds the option for your clients or patients to connect directly with one of your providers. If you choose to add this option, you will be able to set the following features:
- Title of the button. For example, 'Connect to a Psychologist' or 'Connect to a Doctor'.
- Access Controls. This can be a time-based code that would be required by a client or patient to access the clinician's room. This code expires after the time has elapsed. Alternatively, you can set a preset code. This code remains the same all time and provides less security than time-based codes.
- Filtering allows you to choose which of your meeting rooms and clinician rooms will be displayed in the portal.
- Don't forget to click Save when done.
- The Bookings or Appointment Bookings module allows you to create appointment types and gives your clients or patients the ability to book an appointment via the portal. If you have a compatible Practice Management System, you can also integrate bookings using this feature. Click here to learn more. You will have the ability to set up the following:
-
The minimum appointment duration.
-
Appointment types, their duration and their associated costs.
-
Practitioners who will offer the service and their specific settings.
-
Booking options, including patient information.
-
Confirmation emails.
-
Sharing the portal to an existing website.
-
Don't forget to click Save when done.
-
- Lastly, the Waiting area module. This module adds a button to your portal to allow your clients or patients to access your virtual reception or front door (i.e. your Waiting Area). Choosing to display this option depends on your preferred clinic workflow so take that into account prior to activating this module. If you choose to add this option, you will be able to set the following features:
- Title of the button. For example, 'Connect to the Waiting Area'.
-
Access Controls. This can be a time-based code that would be required by a client or patient to access the clinician's room. This code expires after the time has elapsed. Alternatively, you can set a preset code. This code remains the same all time and provides less security than time-based codes.
- Don't forget to click Save when done.
- Publishing your portal. Once you have customised all the relevant settings, it is time to publish your portal. Keep in mind that if you publish the portal, it will go live immediately. However, no one will know it is there until you start advertising that you now offer this feature. To publish your portal, click
 under Published on the Customer Connect configure menu.
Linking your Customer Connect portal to your website
We recommend organisations have a section dedicated to telehealth on their website. The page can provide information about telehealth in general, what services your clinic or practice can or can't offer via telehealth, or any costs associated with telehealth appointments. You can also link your portal on the same web page.
So, engage your website designer to create a page that leads your patient through relevant information until they reach the link to your portal. For a cleaner design, have your website designer add a button to your website with the portal URL behind it.
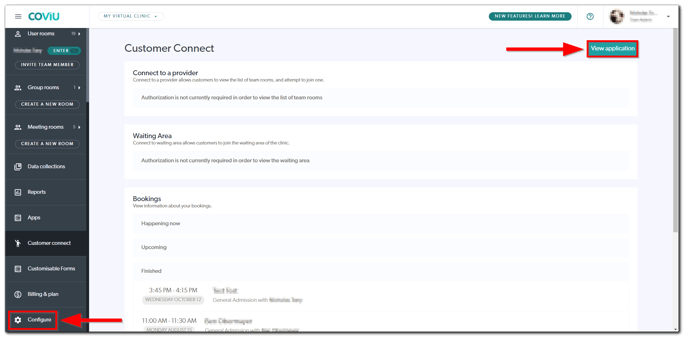
To find your portal URL, click Customer Connect on the left side menu of the Dashboard and click View Application. This will open your portal. We recommend you bookmark it straight away.

You could name the button 'Book a video consultation' or something similar. Here's an example button:

You now have a functioning Customer Connect portal!
How to uninstall an App
Click here to learn how to uninstall an App from your Coviu account.
More support options
You have completed another Coviu help article. You now know how to set up Customer Connect.
If this is not what you were looking for, explore our knowledge base and search for another article from here.
If you still require any assistance, please do not hesitate to get in touch with our friendly Customer Success team using any of the contact methods available here.
